Why Make Cake Bites at Home?
Creating cake bites in your own kitchen isn’t just about satisfying a sweet tooth; it’s about embracing the joy of baking, unleashing your creativity, and enjoying the flexibility to customize every aspect of the dessert to your liking. Below, we delve into the myriad of benefits that come with making cake bites at home, from the personalized touch to health considerations.
Personalization and Creativity
Craft Your Dream Dessert: One of the biggest advantages of making cake bites at home is the ability to personalize them. You choose the flavors, mix-ins, coatings, and decorations. Love the tangy zest of lemon? Incorporate lemon cake and zest into your bites. Craving the classic combination of chocolate and peanut butter? Mix peanut butter chips into your chocolate cake base. The possibilities are endless, allowing you to create a dessert that perfectly suits your taste.
Unleash Your Inner Artist: Beyond taste, homemade cake bites offer a canvas for creativity. Whether you’re drizzling chocolate, sprinkling crushed nuts, or adorning them with edible glitter, each cake bite becomes a mini masterpiece. This creative process not only results in delicious treats but also adds a personal touch that can’t be replicated by store-bought options.
Healthier Alternatives
Control Over Ingredients: When you make cake bites at home, you have complete control over the ingredients. This is particularly beneficial for those with dietary restrictions or health concerns. You can substitute sugar with healthier alternatives, use gluten-free flour, or even incorporate plant-based ingredients for vegan variations. This control ensures that you can enjoy your favorite treats without compromising on health.
Less Processed, More Wholesome: Homemade cake bites often contain fewer preservatives and artificial ingredients than their commercial counterparts. By selecting organic, non-GMO, and fresh ingredients, you make your dessert not just tastier but also healthier. This aspect is especially appealing to health-conscious individuals who are wary of processed foods but still want to indulge in a sweet treat.
Economical and Sustainable
Cost-Effective Treats: Making cake bites at home is also more economical compared to buying them from a bakery or dessert shop. With basic pantry staples and some baking basics, you can create a large batch of cake bites at a fraction of the cost. This affordability does not compromise quality; in fact, it often results in a superior product due to the use of high-quality, fresh ingredients.
Reduce Food Waste: Cake bites are an excellent way to utilize leftover cake, helping to reduce food waste. Instead of throwing away cake that’s a day old or didn’t turn out perfectly, you can give it a new delicious life. This sustainable approach to dessert making not only saves money but also aligns with environmentally friendly practices.
Fun and Fulfilling
A Joyful Baking Experience: The process of making cake bites can be incredibly fun and fulfilling. It’s a chance to experiment with flavors and techniques, learn new baking skills, and even involve family and friends in the process. The act of creating something from scratch brings a sense of accomplishment and makes the end result even more satisfying.
Perfect for Any Occasion: Homemade cake bites are versatile enough to fit any occasion, from casual gatherings to formal events. They can be customized to match the theme of a party, holiday, or special event, making them the perfect addition to any celebration.
In summary, making cake bites at home offers a plethora of benefits, from the joy of customization and the advantage of healthier options to the economical and sustainable aspects of DIY baking. This hands-on approach not only results in delicious treats but also provides a fulfilling experience that encourages creativity and mindfulness about what we eat.
Essential Ingredients and Tools for Making Cake Bites
To embark on your cake bite-making journey, it’s crucial to start with a clear understanding of the basic ingredients and tools required. This preparation ensures a smooth baking process and opens the door to endless creativity. Here’s a comprehensive guide to what you’ll need.
Basic Ingredients
Cake Base: The foundation of your cake bites. You can use a boxed cake mix for convenience or make your cake from scratch using flour, sugar, eggs, and butter. The flavor is up to you—chocolate, vanilla, red velvet, and lemon are popular choices.
Frosting: Used to bind the cake crumbs together. You can opt for store-bought frosting for ease or prepare your own with ingredients like butter, powdered sugar, and vanilla extract for a more personalized touch.
Coating: Chocolate or candy melts are the most common coatings. Choose from dark, milk, or white chocolate, or select colored candy melts to match a specific theme.
Decorations: This is where you can get really creative. Sprinkles, crushed nuts, cookie crumbs, and edible glitter are just a few options to make your cake bites visually appealing and add texture.
Necessary Kitchen Tools
Mixing Bowls: For mixing the cake and frosting. Having a few on hand in different sizes is helpful.
Hand Mixer or Stand Mixer: Essential for mixing cake batter and frosting to the right consistency. A robust mixer can make the process much faster and smoother.
Baking Pan: To bake the cake. A standard 9×13 inch pan works well for most recipes.
Measuring Cups and Spoons: Accuracy is key in baking, so these tools are indispensable for measuring your ingredients.
Scoop or Melon Baller: For scooping out uniform portions of cake mixture. This ensures that your cake bites are consistent in size.
Parchment Paper or Silicone Mats: To line your baking tray for the cake and to place the coated cake bites on. These surfaces prevent sticking and make cleanup easier.
Double Boiler or Microwave: For melting chocolate or candy melts. A double boiler provides more control to prevent burning, but a microwave can work if you’re careful and stir frequently.
Forks or Dipping Tools: For dipping the cake balls into the coating. These tools help you get a smooth finish and tap off excess coating.
Refrigerator or Freezer: Necessary for chilling the cake balls before dipping and setting the coating after.
Optional Tools and Enhancements
Food Processor: If you’re starting with a whole cake, a food processor can quickly crumble it into the perfect texture.
Decorating Bags and Tips: For those who want to add intricate designs with frosting or melted chocolate.
Flavor Extracts and Food Coloring: To add extra flavor to your cake, frosting, or coating, and to color your creations to match specific themes.
Equipping your kitchen with these ingredients and tools is the first step toward making delicious, customized cake bites. With everything in place, you’re ready to dive into the creative process, experimenting with flavors, textures, and designs to create unique and delightful treats that reflect your personal taste and style.
Step-by-Step Guide to Making Cake Bites
Crafting cake bites at home is an enjoyable process that combines baking, creativity, and a touch of patience. This step-by-step guide will walk you through creating these delightful treats, ensuring success even for beginners. Let’s dive into the detailed process.
Preparing the Cake Base
Bake Your Cake: Start by baking your favorite cake. You can use a box mix for convenience or make one from scratch. Chocolate, vanilla, and red velvet are popular choices, but feel free to experiment with any flavor. Follow the recipe or box instructions, bake the cake, and allow it to cool completely. This step is crucial; working with a cake that’s still warm can make your cake bites too moist or mushy.
Crumble the Cake: Once cooled, crumble the cake into fine pieces in a large bowl. You can use your hands or forks to ensure the cake is evenly crumbled. The goal is to have a texture that’s fine enough to blend well with frosting but still retain some structure to hold its shape.
Creating the Cake Bite Mixture
Mix in the Frosting: Add frosting to the crumbled cake. The amount of frosting needed can vary, but start with a half cup for a standard-sized cake and adjust as needed. The mixture should be moist enough to hold together when shaped but not so wet that it becomes gooey. Mix thoroughly until the frosting is evenly distributed.
Test the Mixture: Before proceeding, test the mixture by rolling a small amount into a ball. It should hold together well without cracking or crumbling. If the mixture is too dry, add a bit more frosting. If too wet, you can add a few more cake crumbs if available, or a little powdered sugar to help absorb the excess moisture.
Shaping and Chilling
Roll the Mixture into Balls: Take small portions of the mixture and roll them into balls, about 1 inch in diameter. Place them on a baking sheet lined with parchment paper. This size is ideal for bite-sized treats, but you can adjust according to your preference.
Chill the Cake Balls: Once all the balls are formed, chill them in the refrigerator for at least an hour or in the freezer for about 30 minutes. This step is essential to ensure the balls are firm enough to dip into the coating without falling apart.
Coating Options and Techniques
Prepare Your Coating: Melt chocolate or candy melts in a bowl. You can use a microwave or a double boiler, stirring frequently until smooth. If the coating seems too thick, you can thin it with a little bit of coconut oil or shortening.
Dip and Coat the Cake Balls: Using a fork or a special dipping tool, dip each cake ball into the melted coating, ensuring it’s completely covered. Tap off any excess coating to avoid pooling at the bottom. Place the coated balls back on the parchment paper.
Decorate Before Drying: If you plan to decorate your cake bites with sprinkles, crushed nuts, or any other toppings, do so immediately after dipping while the coating is still wet. This will help the decorations adhere better.
Decoration and Presentation Ideas
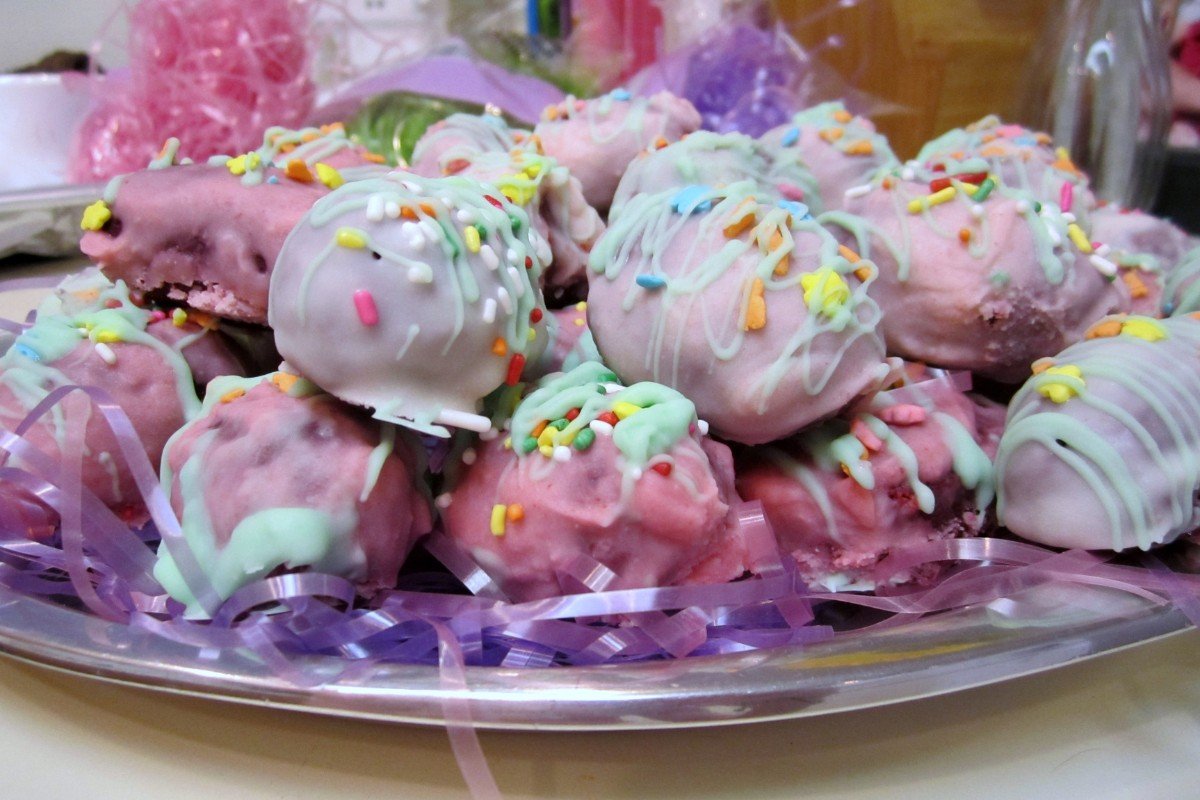
Get Creative with Decorations: Use a variety of toppings and edible glitter for a festive look. You can also drizzle a contrasting color of melted chocolate or candy melts over the coated cake bites for a professional finish.
Elegant Presentation: Once decorated and fully set, you can present your cake bites in mini cupcake liners, arrange them on a platter, or even package them in gift boxes for a special touch. This not only enhances their appearance but also makes them more enticing to eat.
Variations and Flavors
The beauty of cake bites lies in their incredible versatility. From classic flavors to innovative combinations, there’s room to experiment and delight your palate. Whether you’re catering to a seasonal event, adhering to dietary preferences, or simply exploring new tastes, this section guides you through various variations and flavors of cake bites.
Classic Flavors and Combinations
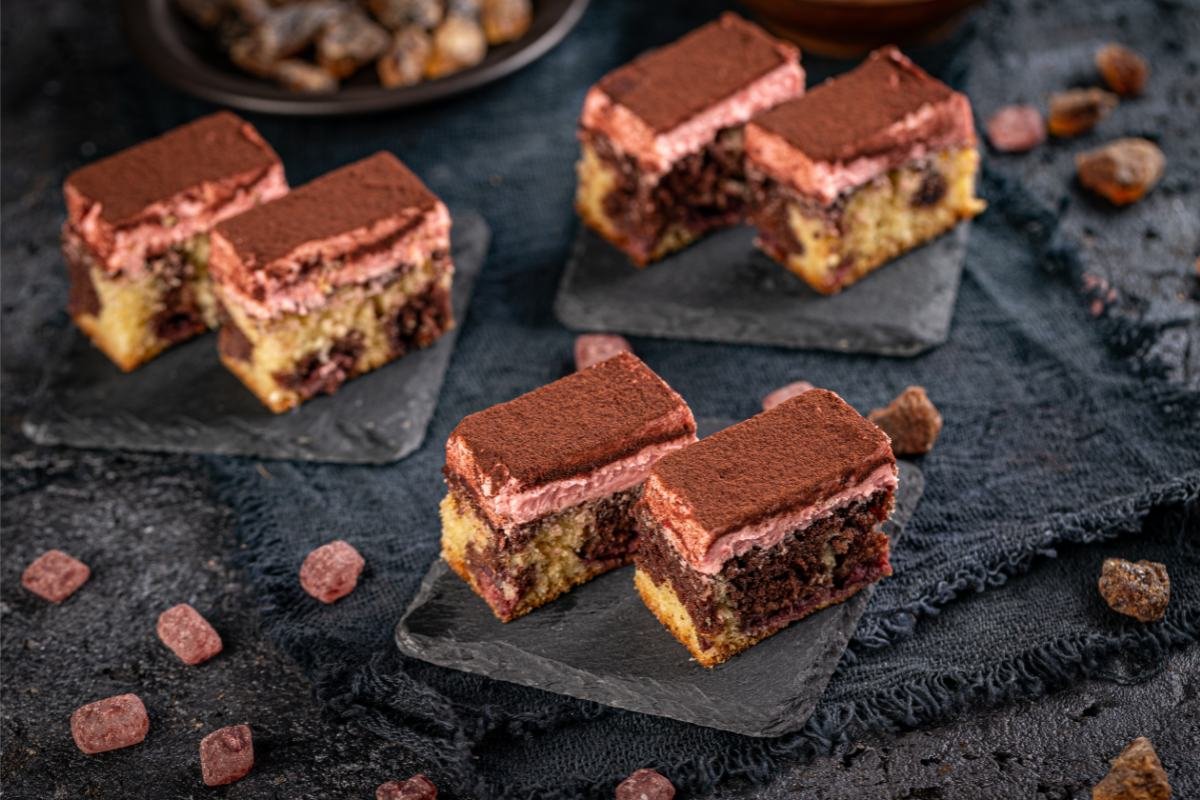
Chocolate Lover’s Dream: Combine rich chocolate cake with chocolate frosting, dipped in dark chocolate, and sprinkled with chocolate shavings. It’s a timeless choice that pleases every chocolate enthusiast.
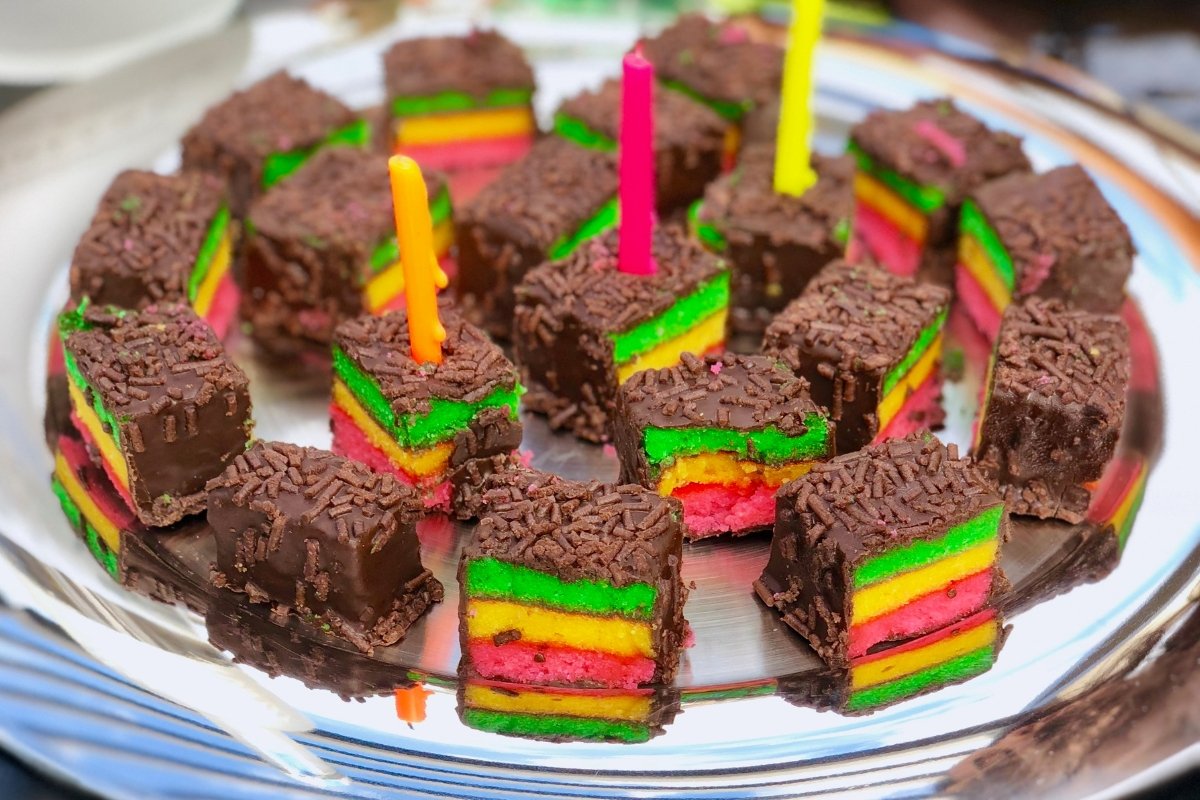
Vanilla Bean Delight: Use a moist vanilla bean cake mixed with creamy vanilla frosting. Dip in white chocolate and top with rainbow sprinkles for a cheerful and classic treat.
Red Velvet Romance: Mix crumbled red velvet cake with cream cheese frosting. Coat in white chocolate and sprinkle with red velvet crumbs for an elegant and romantic bite.
Lemon Zest Freshness: Create a zingy option with lemon cake and lemon buttercream, coated in white chocolate and topped with lemon zest or candied lemon peel for a fresh burst of flavor.
Seasonal and Themed Variations
Pumpkin Spice Autumn Bites: Perfect for fall, mix spiced pumpkin cake with a touch of cinnamon cream cheese frosting. Dip in white chocolate and dust with pumpkin spice.
Peppermint Winter Wonderland: Ideal for the holiday season, use chocolate cake mixed with peppermint buttercream. Coat in dark chocolate and sprinkle with crushed peppermint candies.
Spring Fling Berry Bites: Celebrate spring with a strawberry cake mixed with vanilla frosting, dipped in white chocolate, and topped with a fresh berry or colorful sprinkles.
Summertime Tropical Blast: Bring summer vibes with a coconut cake mixed with pineapple frosting, coated in milk chocolate, and sprinkled with toasted coconut flakes.
Dietary Adaptation
Gluten-Free Indulgence: Substitute your cake base with a gluten-free flour blend to cater to those with gluten sensitivities. Ensure all other ingredients are gluten-free, offering a delicious option without compromise.
Vegan Delights: Use a vegan cake recipe and mix with a vegan-friendly frosting, such as a cashew-based cream. Choose vegan chocolate for dipping to ensure the entire treat is plant-based.
Low-Sugar Solutions: For a lower sugar option, opt for sugar-free cake recipes and sugar-free frostings. Use dark chocolate with a high cocoa content for dipping to maintain the richness without the added sugar.
Tips for Creating Unique Flavors
Experiment with International Flavors: Incorporate flavors from around the world, such as matcha powder for a Japanese-inspired bite, or mango and chili for a treat with Mexican flair.
Infuse with Liquors or Extracts: Add a splash of your favorite liqueur or a few drops of food-grade essential oils and extracts to the frosting for an adult version of cake bites. Consider combinations like coffee and Irish cream or raspberry and almond extract.
Mix and Match Textures: Incorporate crunchy elements like nuts, toffee bits, or crushed cookies into your cake mixture for an added texture surprise.
Play with Colors: Use food coloring in your cake batter, frosting, or coatings to create visually stunning treats that match specific themes or occasions.
Tips and Tricks for Perfect Cake Bites
Making cake bites is an art that requires finesse, and even small adjustments can lead to significant improvements. Here are enhanced tips and tricks that incorporate more transition words to guide you through common pitfalls and elevate your cake bite creations.
Achieving the Right Consistency
Find the Perfect Balance: Initially, it’s crucial to strike a balance between cake and frosting. Too much frosting can lead to overly moist cake bites, whereas too little can result in them falling apart. Consequently, start with a smaller amount of frosting and gradually add more until the mixture can be easily shaped.
Chill for Easier Shaping: Moreover, chilling the cake-frosting mixture for about 30 minutes before shaping makes the process smoother. A chilled mixture is less sticky, allowing for more uniform cake bites.
Coating Cake Bites Like a Pro
Avoid Cracks: To prevent the coating from cracking, ensure the cake bites aren’t too cold when dipped. Otherwise, the temperature difference can cause the coating to crack as it sets. Therefore, letting them sit at room temperature for a few minutes before dipping can help.
Achieve Smooth Coatings: Additionally, to ensure a smooth, even coating, thin the chocolate with a little coconut oil if it’s too thick. Using a fork or a dipping tool, dip and gently tap off any excess.
Enhancing Flavors and Textures
Toast for Extra Flavor: Also, toasting nuts or coconut before adding them can significantly enhance their flavor and add a delightful crunch. Lightly toast these ingredients to elevate the taste of your cake bites.
Opt for Quality Ingredients: Furthermore, using high-quality ingredients like pure vanilla extract and fresh butter makes a noticeable difference in flavor. This commitment to quality ensures your cake bites taste divine.
Decorating with Precision
Use Tools for Decorating: For precise decorations, employing a decorating bottle or a piping bag with a fine tip is advisable. This approach allows for more detailed and professional-looking finishes.
Experiment with Textures: Lastly, experimenting with different textures for decoration can add an unexpected twist. Consider using crushed candies or edible flowers for a unique touch.
By incorporating these tips and tricks, your journey to perfecting cake bites will be smoother and more enjoyable. Each step, from achieving the right consistency to decorating with precision, is crucial for creating delightful treats that not only taste incredible but also look exquisite. Remember, the key to success lies in patience, practice, and a willingness to experiment.
How to Store and Serve Cake Bites
Once you’ve mastered the art of making cake bites, knowing how to store and serve them properly is crucial to maintain their freshness and flavor. Whether you’re preparing them in advance for a party or saving leftovers, these storage and serving tips will ensure your cake bites remain delicious and presentable.
Storing Cake Bites for Freshness
Refrigerate for Short-Term Storage: For short-term storage, place the cake bites in an airtight container and refrigerate. They can be stored this way for up to a week. Refrigeration helps maintain their firmness and prevents the frosting from melting, especially in warmer climates.
Freeze for Long-Term Storage: If you need to store cake bites for a longer period, freezing is the best option. Arrange the cake bites on a baking sheet and freeze them for about an hour. Once they’re solid, transfer them to a freezer-safe airtight container or a ziplock bag. They can be stored in the freezer for up to 3 months. When you’re ready to enjoy them, let them thaw in the refrigerator or at room temperature.
Serving Cake Bites with Elegance
Bring to Room Temperature Before Serving: To ensure the best flavor and texture, bring the cake bites to room temperature before serving, especially if they’ve been refrigerated or frozen. This allows the flavors to meld together beautifully and makes the cake more tender.
Presentation Matters: Serve cake bites on a decorative platter, tiered cake stand, or in individual mini cupcake liners for an added touch of elegance. Consider the theme or color scheme of your event when choosing your presentation style. A well-presented platter of cake bites can be a visually stunning addition to any table.
Pairing with Beverages
Coffee and Tea: Cake bites pair wonderfully with coffee and tea, making them a perfect treat for brunches or afternoon tea parties. The richness of the cake complements the bitterness of coffee and the subtlety of tea, providing a balanced and delightful experience.
Dessert Wines and Spirits: For a more adult gathering, pair cake bites with dessert wines like port, sherry, or moscato. The sweetness of the wine complements the decadence of the cake bites. You can also pair them with spirits such as amaretto or bourbon for a unique tasting experience.
Special Touches
Customize to the Occasion: Tailor the decorations and presentation of your cake bites to fit the occasion. Use themed decorations for holidays, match the color scheme for weddings or parties, or add personalized touches for birthdays.
Offer a Variety: Providing a variety of flavors and decorations can cater to different tastes and make the serving more visually appealing. A mix of dark chocolate, white chocolate, and colored coatings, along with various toppings, can offer something for everyone.
By following these storage and serving tips, you can ensure your cake bites are not only a treat for the taste buds but also a feast for the eyes. Proper storage will keep them fresh and delicious, while thoughtful presentation and pairing can elevate your gathering, making your homemade cake bites the highlight of any event.