
Introduction
Embracing the Art of Homemade Cake Cones
Imagine stepping into a world where every bite of a cake cone is not just a treat, but a reflection of your creativity and culinary skills. That’s the joy of making cake cones at home—a delightful journey from choosing your ingredients to savoring the very last bite. This process transforms an ordinary dessert into an extraordinary experience, tailor-made to suit every palate and preference.
The Sensory Delight of Cake Cones
Homemade cake cones are a feast for the senses. Visually, they’re a canvas waiting for your artistic touch, whether it’s a dip in glossy chocolate or a sprinkle of vibrant edible decorations. The texture—soft yet sturdy—promises a satisfying crunch with every bite, holding the weight of your favorite ice cream or filling. And the aroma? It’s the sweet scent of baking that fills your home, a fragrance that promises something delicious is on its way.
Crafting Memories Beyond Desserts
But the beauty of making cake cones at home goes beyond the dessert itself. It’s about the memories you create in the kitchen, the laughter shared over a bowl of batter, and the pride in presenting a dessert you made from scratch. Whether it’s a family weekend project, a special treat for a friend’s birthday, or simply a way to unwind, the act of making cake cones turns a simple dessert into an occasion.
Dive into the Joy of Homemade Cake Cones
Join us as we embark on this sweet adventure, exploring every facet of homemade cake cones. From their rich history to the tips and tricks of crafting them to perfection, we’ll guide you through making these delightful treats. It’s time to gather your ingredients, unleash your creativity, and dive into the world of homemade cake cones.
The History of Cake Cones
The Birth of a Classic
Cake cones began their journey in the early 20th century, not as a planned invention but as a serendipitous creation. Born from the need to provide a convenient, edible vessel for ice cream, the cake cone quickly went from a makeshift solution at fairs and ice cream parlors to a beloved global phenomenon. Unlike its crunchier counterpart, the waffle cone, the cake cone offered a softer, cake-like texture that many found irresistible. This distinction made it an instant favorite among those who preferred a gentler contrast to their creamy ice cream.
A Sweet Evolution
As the popularity of cake cones soared, so did their variety. Bakers and confectioners began experimenting with flavors and ingredients, transforming the simple cake cone into a canvas for culinary creativity. Vanilla and chocolate were soon joined by more adventurous flavors like strawberry, mint, and even lavender. The evolution of cake cones mirrored the growing trend for personalized desserts, catering to a wide range of tastes and dietary preferences.
Cake Cones Around the World
The cake cone’s journey from an American innovation to a worldwide delight is a testament to its universal appeal. Each country and culture added its twist to the classic, incorporating local flavors and ingredients. In some parts of the world, cake cones are filled with traditional sweets and fruits, making them a unique fusion of global and local dessert traditions. This adaptability ensured that the cake cone remained a relevant and cherished part of the global dessert landscape.
The Art of Making Cake Cones at Home
With the rise of home baking in recent years, the art of making cake cones from scratch has seen a resurgence. Enthusiasts and amateurs alike have embraced the challenge, finding joy in the process of crafting these treats at home. The internet and social media have played pivotal roles, offering a platform for sharing recipes, tips, and personal twists on the classic cone. This collective experimentation and sharing have enriched the tradition of cake cone making, turning it into a communal and evolving culinary art.
Celebrating the Cake Cone Legacy
The history of cake cones is more than just a chronicle of a dessert’s evolution; it’s a story of innovation, adaptation, and community. From its accidental origins to its status as a staple of homemade dessert crafting, the cake cone continues to inspire and delight. As we explore the next chapters in making cake cones at home, we carry forward a legacy of creativity, pleasure, and shared experiences. The cake cone, a simple dessert with a rich history, remains a testament to the joy of baking and the enduring appeal of a well-made treat.
Benefits of Homemade Cake Cones
Tailor-Made to Taste
One of the most compelling reasons to make cake cones at home is the ability to customize them to your exact preferences. Whether you’re catering to specific dietary needs or you’re simply in the mood for a unique flavor combination, homemade cake cones offer a level of personalization that store-bought ones can’t match. From gluten-free flours to vegan ingredients, the flexibility of homemade recipes means that everyone, regardless of dietary restrictions, can enjoy a cake cone tailored just for them.
A Healthier Option
Crafting cake cones in your kitchen also means you have control over the ingredients, allowing you to make healthier choices. By selecting organic, non-processed components, or reducing sugar content, you can create a treat that’s kinder to your body without sacrificing taste. This control is particularly beneficial for parents looking to reduce the intake of additives and preservatives in their children’s diets, ensuring that even indulgent treats can have a place in a balanced lifestyle.
The Joy of Baking Together
Beyond the obvious edible delights, making cake cones at home is an activity that brings people together. It’s a chance for family and friends to bond over the shared experience of baking, from the excitement of mixing the batter to the anticipation of tasting the final product. These moments spent in the kitchen are not just about creating something delicious; they’re about creating memories that last a lifetime, instilling a sense of accomplishment and togetherness.
Unleashing Creative Potential
The process of making cake cones is an outlet for creativity. Beyond choosing flavors and ingredients, there’s the decoration of the cones themselves and the myriad ways they can be served. This creative expression is not just limited to the aesthetic; it extends to experimenting with textures and ingredients, encouraging bakers to think outside the cone. The result is not just a dessert, but a personal masterpiece that reflects the maker’s imagination and skill.
Economic Benefits
On a practical note, making cake cones at home can also be more economical than purchasing premade ones or visiting dessert shops. By buying ingredients in bulk and utilizing pantry staples, you can produce a larger quantity of cones at a fraction of the cost. This affordability does not compromise quality; in fact, it often enhances it, as homemade cones are typically fresher and more flavorful than their commercial counterparts.
The Sweet Satisfaction of Homemade Cake Cones
Embracing the art of making cake cones at home is about more than just the end product. It’s about the pride in creating something from scratch, the joy of sharing the process and the results with loved ones, and the satisfaction of indulging in a treat that’s exactly to your liking. The benefits of homemade cake cones extend far beyond the palate, touching on aspects of health, economy, and social connection, making every cone a celebration of creativity, community, and culinary delight.
Essential Ingredients and Tools for Homemade Cake Cones
The Foundation: Ingredients
The journey to crafting the perfect homemade cake cone begins with gathering the right ingredients. At its core, a basic cake cone batter requires only a few staple items: flour, sugar, eggs, and butter. However, the beauty of making cake cones at home lies in the ability to customize and experiment.
- Flour: All-purpose flour works best for a neutral base, but for those with dietary preferences or restrictions, gluten-free alternatives like almond or oat flour can be excellent substitutes.
- Sugar: While granulated sugar is standard, swapping it for coconut sugar or honey can offer a deeper flavor and, in some cases, a healthier profile.
- Eggs: They bind the mixture, ensuring your cones have the perfect texture. For a vegan option, flaxseed or chia seed mixtures can act as effective binders.
- Butter: Unsalted butter is preferred for its ability to let the flavors shine, but coconut oil or vegan butter are great alternatives for different dietary needs.
Flavoring Your Creation
The next step is to decide on your flavors. Vanilla extract is a classic addition, but don’t stop there. Consider incorporating almond extract, citrus zests, or even spices like cinnamon or nutmeg to create a unique taste profile. For those looking to push the boundaries, lavender, rose water, or matcha powder can transform your cones into gourmet creations.
Tools of the Trade
Having the right tools is just as crucial as having the right ingredients. Here’s what you’ll need to bring your cake cones to life:
- Cone Mold or Waffle Cone Maker: Essential for shaping your cones, these can range from specialized electric appliances to simple, manual molds.
- Mixing Bowls: A variety of sizes will help you mix your batter and flavors with ease.
- Whisk and Spatula: For combining your ingredients smoothly and scraping the batter out of bowls.
- Baking Sheet: If you’re using a cone mold, a baking sheet will be necessary for baking your cone shapes before rolling them.
- Measuring Cups and Spoons: Precision is key in baking, so these tools will ensure your ingredients are accurately portioned.
Preparing Your Workspace
Before you begin, it’s important to organize your workspace. Ensure your ingredients are measured and your tools are within reach. A clean, clutter-free counter provides the perfect stage for your cake cone creation process. Preparation not only streamlines the baking experience but also makes it more enjoyable.
Ready, Set, Bake!
With your ingredients chosen and tools at the ready, you’re poised to embark on the delightful task of making homemade cake cones. Remember, the process is as much about creativity and personal expression as it is about following a recipe. Feel empowered to experiment with flavors, textures, and colors. The goal is not just to make a treat but to create an experience that reflects your taste and brings joy to those who share in your homemade delicacies.
Step-by-Step Recipe for Cake Cones
Creating homemade cake cones is an enjoyable and rewarding baking project. Here’s a detailed guide to help you through the process, ensuring your cake cones are a delightful success.
Preparing the Batter
- Mix the Dry Ingredients: In a large mixing bowl, sift together 1 cup of all-purpose flour, ½ cup of granulated sugar, and a pinch of salt. This ensures your batter is lump-free and airy.
- Combine Wet Ingredients: In a separate bowl, whisk together 2 large eggs, ½ cup of melted unsalted butter, and 1 teaspoon of vanilla extract. If you’re feeling adventurous, this is the moment to add any alternative flavors like almond extract or citrus zest.
- Combine Wet and Dry Ingredients: Gradually mix the wet ingredients into the dry ingredients. Stir until the mixture is smooth and homogenous. The goal is a batter that’s thick enough to hold its shape but still fluid.
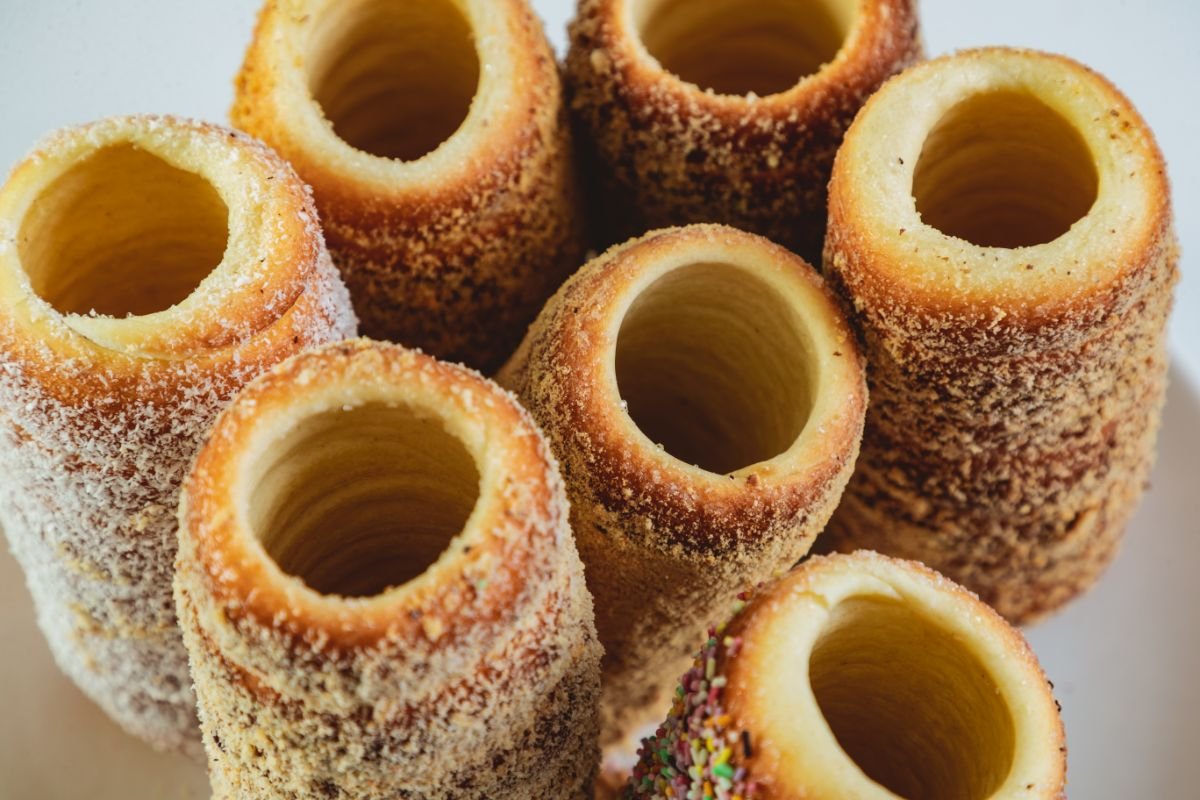
Shaping the Cones
- Prepare Your Cone Mold or Waffle Cone Maker: If using a waffle cone maker, preheat it according to the manufacturer’s instructions. For a cone mold, grease it lightly and set it aside. Preheat your oven to 350°F (175°C) if you’re baking the cones.
- Form the Cone Shapes: For a waffle cone maker, pour a small amount of batter onto the center of the preheated iron. Close the lid and cook until golden brown, usually for about 1-2 minutes. If using an oven, spread the batter into thin circles on a parchment-lined baking sheet and bake for about 5-7 minutes, or until the edges start to brown.
- Mold Immediately: Working quickly and carefully (the batter will be hot), wrap the baked circle around your cone mold. Press the edges to seal and hold for a few seconds until it begins to set. If you’re using a waffle cone maker, you can roll the warm, flat cone around the mold provided.
Cooling and Storage
- Cool Completely: Set the formed cones on a wire rack to cool. They will harden as they cool, becoming crispy.
- Store Properly: Once cooled, store your cake cones in an airtight container. They’re best enjoyed within a few days to maintain their crispness.
Personalizing Your Cake Cones
- Flavor Variations: Don’t hesitate to experiment with the batter. Incorporating cocoa powder for chocolate cones, matcha powder for a green tea flavor, or finely ground nuts for texture and taste can elevate your cones to gourmet status.
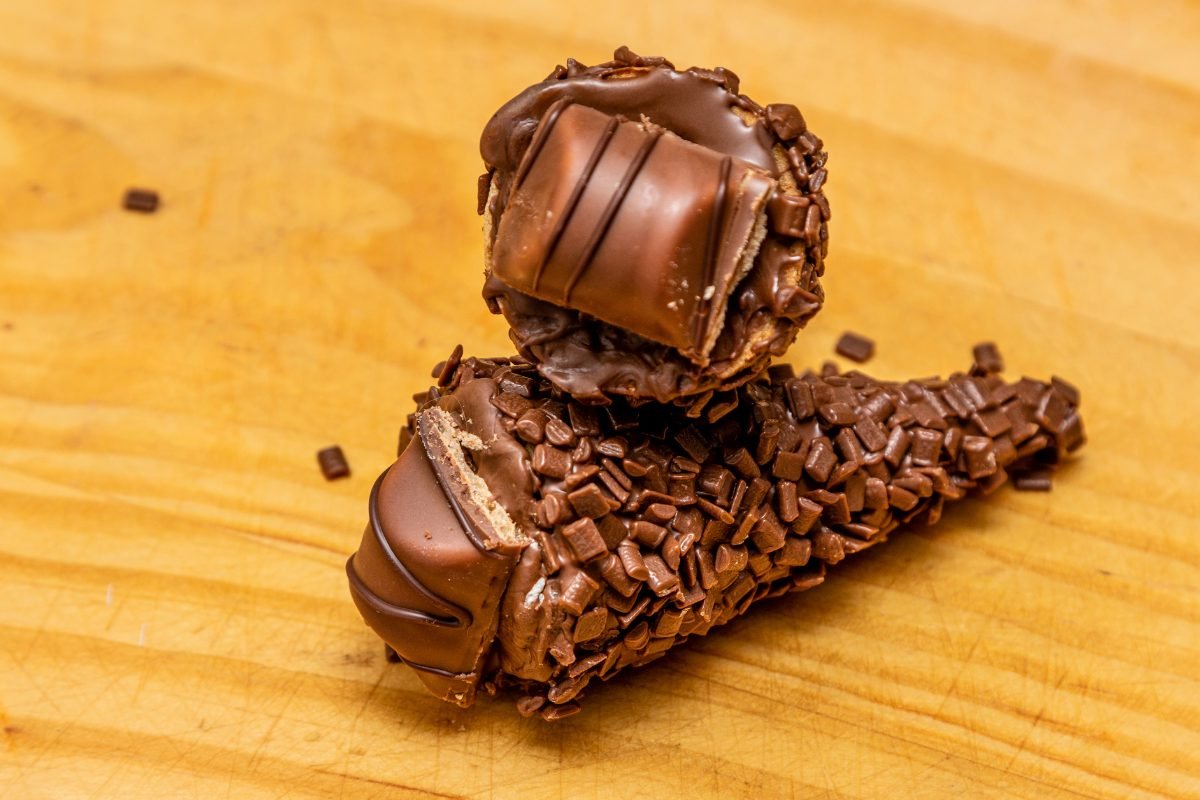
- Decorations and Toppings: Once your cones are baked and cooled, dip the tops in melted chocolate and sprinkle with nuts, colored sprinkles, or candy bits for an extra decorative touch.
Tips for Success
- Work Quickly: The batter becomes brittle as it cools, so shaping should be done immediately after removal from heat.
- Even Thickness: Ensure your batter is spread evenly to avoid thin spots that can lead to breakage.
- Practice Makes Perfect: The first few cones might not be perfect, but each attempt will bring you closer to mastering the technique.
Conclusion
Making homemade cake cones is a fun and creative baking project that rewards you with delicious, customizable treats. Whether you stick to the classic vanilla or venture into more exotic flavors, the process offers a satisfying blend of artistry and culinary skill. Enjoy the process, share your creations with loved ones, and don’t forget to savor every bite of your homemade cake cones!
Decorating Your Cake Cones
Decorating cake cones transforms them from simple treats into spectacular desserts. This section explores creative and eye-catching ways to embellish your homemade cake cones, making them not just delicious but visually stunning as well.
Dipping in Decadence
- Chocolate or Candy Melts: Melt your choice of chocolate or candy melts in a microwave or over a double boiler. Dip the top of each cone into the melted chocolate, then turn it upright to let the excess drip off. This creates a deliciously rich layer that adds both flavor and texture.
- Customize with Colors: To add a splash of color, consider using white chocolate tinted with food coloring. This is especially fun for themed parties or holidays—think orange for Halloween, red and green for Christmas, or pastel shades for Easter.
Embellishing with Edibles
- Sprinkles and Sugars: Before the chocolate sets, sprinkle the cones with colored sugars, sprinkles, or even edible glitter. This not only enhances the visual appeal but also introduces interesting textures.
- Nuts and Crushed Candies: For a crunchier texture, roll the dipped cones in chopped nuts, crushed candy bars, or cookie crumbs. These toppings add a delightful contrast to the soft cake cone and creamy fillings.
Artistic Additions
- Piped Patterns: Use royal icing or melted chocolate in a piping bag to create intricate designs on your cones. Zigzags, dots, and swirls can transform your cones into works of art.
- Edible Paint: For the truly adventurous, mix a little food coloring with vodka or lemon extract to create “paint.” Use a clean paintbrush to add floral designs, abstract patterns, or even personalized messages to your cones.
Filling with Flair
- Beyond Ice Cream: While ice cream is the classic filling, don’t be afraid to get creative. Mousse, fruit salad, or even cheesecake filling can turn your cake cone into a unique dessert experience.
- Layered Delights: Consider layering different fillings and flavors inside your cones. A base layer of chocolate sauce or fruit compote, followed by your main filling, and topped with whipped cream can make each bite an adventure.
Presentation Perfection
- Display Stands: Create or purchase a cone stand to display your decorated cake cones. Not only does this make for an impressive presentation, but it also makes serving and enjoying the cones easier.
- Edible Decor: Garnish the fillings with small edible flowers, fresh berries, or a dusting of powdered sugar for a final touch that’s as beautiful as it is delicious.
Tips for Decorating Success
- Let Chocolate Set: After dipping cones in chocolate, allow them to set completely, either at room temperature or in the refrigerator, before adding additional decorations.
- Experiment with Themes: Match your decorations to the theme of your event or season. This thoughtful detail elevates the overall experience.
- Practice Patience: Decorating with precision takes time. Don’t rush the process; enjoy the creative journey.
Serving Suggestions for Homemade Cake Cones
Serving your beautifully crafted and decorated cake cones can be as creative as making them. Here are some inventive ways to present and enjoy your homemade treats that will surely impress your guests or make any family dessert time special.
Creative Presentation Ideas
- Cone Bouquets: Arrange your cake cones in a vase or a specially designed stand to create a visually stunning bouquet. This not only serves as a dessert but also doubles as a centerpiece for your table, blending decor with deliciousness.
- Dessert Platters: Mix and match your cake cones with other homemade treats on a large platter. This allows guests to choose their favorites and creates a visually appealing dessert buffet.
- Individual Serving Stands: For a more formal or personalized touch, place each cake cone in a small stand or a cupcake liner. This makes it easy for guests to pick up and enjoy their dessert without a mess.
Pairing with Beverages
- Coffee and Cones: Pair your cake cones with freshly brewed coffee or espresso. The combination of a warm beverage with the sweet, crunchy cone creates a perfect balance of flavors.
- Ice Cream Floats in a Cone: For a twist on the traditional float, pour a small amount of soda or sparkling water into a cone filled with a scoop of ice cream. It’s a fun, fizzy treat that’s sure to delight.
- Dessert Wines and Cones: Select a dessert wine that complements the flavors of your cake cone fillings. This pairing elevates the dessert experience, making it ideal for dinner parties or special occasions.
Interactive Dessert Stations
- Build-Your-Own Cone Bar: Set up a station with various fillings, toppings, and sauces, allowing guests to customize their cake cones. This interactive element adds fun to the dessert course and lets guests tailor their treats to their tastes.
- Cone Decorating Contest: Provide plain cake cones, icing, and decorations, and challenge your guests to create the most elaborately decorated cone. This is particularly popular at children’s parties but can be a hit with adults, too, sparking creativity and laughter.
Tips for a Successful Serving
- Prep in Advance: If serving at a party, prepare your cones and as many elements of the fillings and toppings ahead of time. This will make assembly quick and easy when it’s dessert time.
- Consider Temperature: If filling with ice cream or another cold dessert, keep your fillings chilled until the last possible moment to prevent melting.
- Presentation Matters: Take the time to arrange your serving display attractively. Even simple setups can look stunning with a little care in presentation.
Storing and Making Ahead – Ensuring Freshness
Want to enjoy your cake cones later? Follow these steps for optimal freshness. First, let your cones cool down completely after baking. This step is crucial. It prevents moisture from trapping inside the storage container, which could make the cones soggy. Once cool, store them in airtight containers. This method helps keep moisture at bay. Remember, storing them at room temperature in a dry place is key. Avoid refrigeration if possible, as it might add unwanted moisture, compromising the cone’s crispiness.
Looking forward to an event? You can get a head start by preparing the batter up to two days before. Just store it covered in the fridge. When it’s time, bake your cones as close to the event as you can. This ensures they maintain their perfect texture. Planning to decorate your cones with chocolate or icing? It’s best to add these final touches closer to the time you plan to serve them. This approach keeps the decorations looking pristine and prevents any potential smudging during storage.
Conclusion
Now, with these insights and tips in hand, you’re fully equipped to embark on your homemade cake cone adventure. We’ve navigated through the nuances of crafting, decorating, and even serving these delightful treats. The next steps are yours to take. Embrace the joy of baking and let your creativity flourish. For further inspiration and a myriad of recipes, make sure to visit recipeszap.com. There, you’ll find endless possibilities to enhance your culinary journey. So, happy baking! Let these homemade cake cones be a testament to your creativity, bringing joy and a touch of sweetness to every gathering.